Okay, we’re not gonna lie to you. Painting chrome isn’t your average, easy, 3-step DIY job. If you’ve ever painted directly onto chrome, you probably got it wrong, it probably all flaked off and you probably weren’t happy.
Painting chrome properly is a lengthy process, and it can be difficult to get it right, but we’ve got some good news for you – it’s pretty easy if you’re patient and follow the right steps.
We’re here to help.
In this article, we’ve brought you the internet’s simplest guide to painting chrome. We’ve brought you a concise, no-nonsense list of all the stuff you need along with an easy-to-follow guide on exactly how to do it.
Got rusty, dented, shoddy chrome? Want it to look better? Want an automotive revamp? Want to make your bathroom look better? No matter why you want to paint your chrome, we’ve unpacked exactly how to do it. Read on!
How to Paint Chrome: A Simple, Foolproof Step-By-Step Guide
Step 1: Assemble Your Equipment
To paint chrome, you need a lot of stuff – some of it simple, some of it specialist. Assemble the following:
- Liquid dish soap (normal household stuff is fine)
- A bucket
- Rags
- A toothbrush
- Sandpaper (of various grits, but more on this in stage 3 below)
- A circular sander (if you’re painting a large surface)
- Protective goggles
- Liquid metal filler
- Newspaper (or old bed sheets, for keeping your painting area clean and tidy)
- Appropriate primers (more on this in stages 7 and 8 below)
- Paint (obviously)
- Paintbrushes (if you’re not using spray paint)
- Face mask
- Lacquer thinner or wax remover
- Disposable gloves (if you don’t want to get your hands dirty)
Step 2: Clean Your Chrome
It’s hugely important that you get your chrome as clean as you can. Fill a bucket with dish soap and warm water, then use a rag and a toothbrush to get that chrome sparkling. Make sure it’s as clean as you can possibly get it before drying it with another rag.
Step 3: Rough Things Up
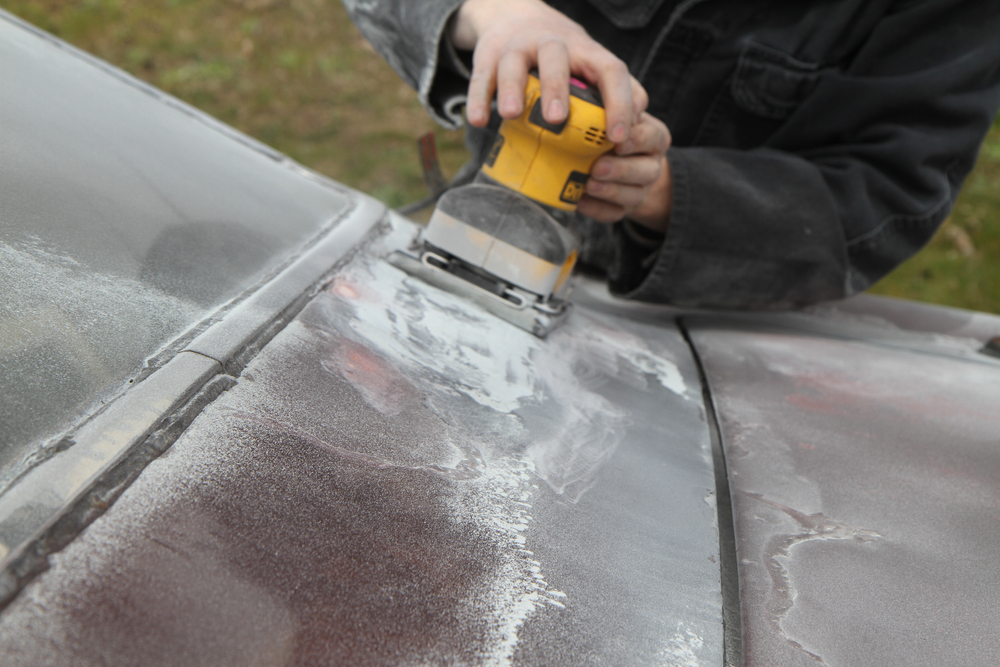
The main reason chrome is hard to paint is because it’s so sleek and shiny. It’s smooth and sleek to the touch, making it near-impossible to just slap paint on. Roughing the surface up is therefore very important, as it’s the first stage in helping the paint to stick.
Grab your sandpaper and goggles, and start sanding your surface. If you’re only sanding small surfaces, you can do this by hand – but if you’re sanding a huge object, you’ll probably want to use a circular sander.
Use sandpaper grits of around 320 to 120, starting with the 120, and increasing incrementally in number. If you’re confused by the grades of sandpaper grits, these numbers simply refer to how coarse or smooth the sandpaper is, so different grits are suitable for different jobs. Here’s a great guide.
Make sure you’re sanding in circular motions, so you don’t put any big lines or scratches in your chrome.
If you already have any dents, holes, pits or grooves in your chrome, you need to sand the chrome enough that these marks no longer stand out.
If you have any huge cracks, dents, holes or pits which you can’t just sand away, you’ll need to instead fill them in.
Use some liquid metal filler (like this excellent Permatex Liquid Metal Filler) to plug the gaps. Make sure the area you’re filling is very dry and clean, and always make sure you’re following the instructions on the packaging of whatever product you’re using.
Step 4: Wipe off, Check and Re-Rough
It’s time to check if all of your chrome has been sufficiently roughened. Start by wiping, blowing and cleaning away any dust and debris.
(If you’ve filled any gaps with liquid metal filler, you’ll of course need to wait for the liquid metal filler to dry before you move on to this stage.)
If you want your paint to stick to your chrome, it needs to be completely, consistently roughened-up, with absolutely no sleek or shiny patches. So no matter how much of a good job you think you’ve done in step 3 (and no matter how arduous this if getting), you’ll probably need to do more sanding. Check the chrome as carefully as you can, making sure to look in all of the hard-to-access places.
Before you started sanding your chrome, it would have been smooth and sleek, with a glass-like, glossy, shiny finish. Now, after all of the sanding you’ve done, it’ll still be smooth, but it’ll look sort of smoky or misty. Once you’ve achieved this look, you’ll know you’ve sanded away all of the shiny top layer (which is actually rust, but let’s not get into the details), and you’ve created an even, sanded, rougher layer which is ready for some paint.
When you’re 100% confident that your sanding odyssey is over, blow and wipe away all dust and debris.
Step 5: Re-Clean
Wash the chrome again, using warm water and a clean cloth. You don’t need to use dish soap during this stage, as you’re hopefully only wiping away dust. After you’ve cleaned the chrome, dry it thoroughly with another clean, fresh cloth.
Wipe the entire painting surface with lacquer thinner or wax remover. Again, applying one of these products will help the paint to stick.
Step 6: Prep Your Space
Get some newspaper or old bed sheets, and cover the area around and underneath whatever you’ll be painting. Don’t forget to cover any non-chrome fixtures that are attached to your chrome.
Step 7: Primetime
Before you apply your chosen paint color, you need to apply some primer. First, make sure you apply an appropriate primer:
- If your chrome will be coming into contact with water (if you’re painting a car, a bike, bathroom features etc), use an automotive metal primer, which is built to withstand repeated exposure to water and moisture. This Eastwood primer is a great option.
- If your chrome won’t be coming into contact with water, use a rust-inhibiting primer instead (such as this excellent stuff from Rust-Oleum).
Make sure the first primer you use is definitely suitable for chrome, and that it’s a “self-etching primer,” which is designed to make the chrome very grippable, and offer some resistance against rust and corrosion. If you’re unsure, speak to someone at your local hardware store.
Whatever primer you go for, apply two thin coats, making sure the first is properly dry before you apply the second. Make sure your primer covers everything you plan to paint – without it, your top coat won’t stick properly. Spray-on primers and brush-on primers are both fine, so use whichever you prefer, or whichever you’re most comfortable with.
If you’re using spray paint, make sure you wear a face mask – you don’t want to be breathing in those fumes.
When you’re done, make sure your chrome is completely dry before moving on to step 8.
Step 8: More Primer
Okay, you’ve already applied your self-etching primer. You now need to apply some high-build primer, which sort of serves as the glue between your top coat and your self-etching primer. Again, you’ll need one or two coats, and you should always make sure your first coat is completely dry before applying a second coat.
Again, if you’re using spray paint, make sure you wear a face mask.
Step 9: Paint Time
It’s (finally) time to do your actual painting with your chosen top coat.
Make sure your primer is 100% dry, then start on your top coat. If you used automotive primer during step 7, make sure you use automotive enamel during this step. If you didn’t use automotive primer during step 7, you’re free to use any good-quality acrylic or latex paint.
Again, you’ll probably need a couple of coats, no matter whether you’re using spray paint or brush-on paint. Paint in thin coats, don’t allow for any drips or blobs, and brush them away immediately if any occur.
When you’re done, let your paint job dry fully and properly.
Step 10: Smile
Hopefully, if you’ve done the job properly, you’ll be left with a brilliant chrome paint job. It’s time to relax, smile and enjoy your handiwork.
If you feel your chrome needs another coat, start again from step 5. But if you’ve been patient and careful, and followed the steps outlined above, that’s unlikely to be the case.
Final Words
There you have it – how to paint chrome. You’ve now got all the tips, help and information you need to paint chrome with no problems and no fuss.
Want to know anything else about painting? We have lots of excellent guides on our site, including articles on how to paint aluminum, how to clean paint brushes, and a guide to the different types of wall paint. We’re your one-stop shop for DIY details!