Installing a light fixture is a super easy job, and you usually don’t need to get a professional or expert to do it for you. However, you do need to make sure you don’t electrocute yourself to death, but other than that, installing a light fixture is a pretty simple job for even the biggest DIY-phobic person.
If you want to know how to install a light fixture, this guide has all the help, hints and tips you need. We’ve included a step-by-step guide, some pro-tips and useful safety pointers.
So, crack out your toolbox, grab your light fixture and join us. Below are 5 easy steps to install it.
How to Install a Light Fixture — Our Step-By-Step Guide
Follow these steps carefully (especially the safety tips), and you’ll have the job done in no time.
#1: Shut the Power Off
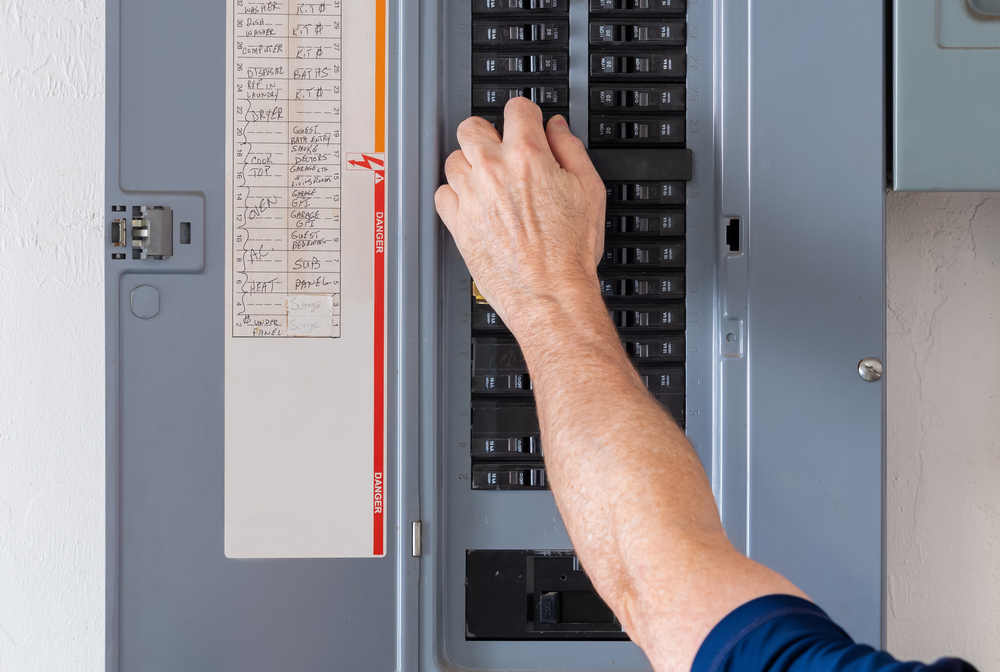
To stay safe, this is the most important step, and it’s essential.
Before you do anything else, shut your power off. Properly.
That doesn’t mean just turning off your light switch. In other words, there’s probably still power running to the wires you’ll be fiddling with. And if you’re fiddling with powered-up wires, you’ll wind up fried.
So, what you instead need to do is turn the power off at your breaker so that there’s no longer any power running to your wires.
If you don’t know what your breaker looks like or how to turn it off, this short video is massively helpful.
While you can switch off all power to your house if you like, it’s best to go one by one and only turn off power for the area you’ll be using. After all, no one wants to sit in a house with absolutely no power.
Pro-Tip: If you’re feeling productive, you could even use this opportunity to label all your breaker switches. If you’re lucky, your switches might already be labeled if you had a keen DIYer living in your house before you.
Once you’ve switched off the power in the area you’re installing your lighting fixture, use a voltage tester to check that it is definitely off. If you don’t have a voltage tester, it’s essential you use one: this Neoteck Voltage Tester is an excellent, simple, and affordable option. Even after you’ve turned off ALL power in your home, there’s a small chance that the wires are still live, so make sure you use a voltage tester.
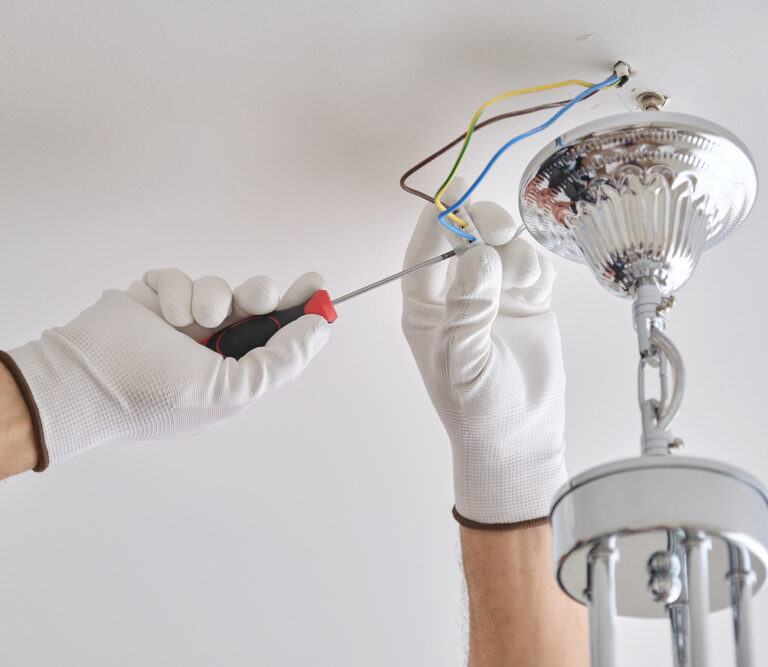
#2: Reveal, Identify, and Prep Your Wires
Okay, this is the part where many people get confused and worried. But fear not! All you need to do is identify three wires, and you’re golden.
First, take off the existing light fixture that you want to replace. It should be held in place with a screw or two, and it’ll be very easy to take off. When you’ve removed the existing light fixture, you’ll see three wires:
- Black wire: current
- White wire: neutral
- Copper wire: ground
Important disclaimer: the colors above are usually what you’ll find in the US. But it’s important to note that different countries have different colored wires to indicate various functions. So, if you’re not from the US, check the relevant colors before you begin).
Once you’ve identified your wires, strip around ¾” wire sheathing from each one, and you’re ready to install your new light fixture.
#3: Attach Your Wires to Your Light Fixture
Here’s the part where you actually get to install your new light fixture.
The first (and most important) step is to attach your wires to your new light fixture by matching the colors of your wires to those of the screws (or wires) on your new light fixture.
If you’re matching wires, you can simply match color to color and twist the wires around one another until they’re firmly fixed. If you’re matching existing wires to the screws on your new light fixture, then you match them up as follows:
- Black wire to gold screw
- White wire to silver screw
- Copper wire to green screw
If you’re attaching wires to screws, you need to loosen (but not remove) them before wrapping the wires around the base and screwing them tight to clamp the wires in place.
Before you follow the instructions in this stage, check the box that your light fixture came in. There will be specific instructions for what you should do. Most of the time, the above will be correct, but if your box says anything different, listen to the box instead of us.
#4: Attach Your Light Fixture to Your Ceiling
Okay, the most difficult parts are done. Now all you need to do is attach your light fixture to your ceiling. There’ll usually be a couple of screw holes in your light fixture. All you need to do (and you probably worked this out for yourself) is grab some screws and fix them through the holes and into your ceiling. All done!
If it’s a heavy light fixture, get someone to hold it for you while you screw it in.
If it’s a very heavy light fixture, be aware that your ceiling might not be able to support the weight. Instead, you might need to attach it to your ceiling joists rather than just to the surface of the ceiling. But if that’s the case, the box (or the instructions that come with the box) will instruct you to do so.
If you also need to change your bulb while you’re here (or switch to an LED bulb), now’s a good time to do it.
#5: Check Everything Is Working

Okay, now it’s time to get that power back on and see whether your DIY endeavor has been a success.
Go back to your breaker, switch it on, turn on your light switch, and hopefully, everything will work. If so, you’ve successfully installed a light fixture, and you’re officially a certified DIY genius (well, that’s what you can tell your friends, anyway).
If not, you’ll need to switch off that breaker again and check why it’s not working. Uninstall your light fixture, make sure all the connections are secure and re-secure any of the ones that don’t look 100% right.
That said, it’s very unlikely that you’ll need to make any alterations if you’ve carefully followed the step-by-step advice above.
Safety Tips for Installing a Light Fixture
Before you get all excited and start installing your light fixture, here are some pro safety tips to keep you safe and shock-free:
- Make sure you read all packaging instructions, which might give you some safety tips that we haven’t covered.
- Don’t exceed the maximum wattage of your fixture. This could cause a fire or an outage. Check the fixture packaging for the maximum wattage.
- Make sure there are no kids or animals around when installing your light fixture. Kids and animals are clumsy, and they’re not a good mix with electricity, glass and ladders.
- While we’re talking about ladders, make sure you use some. You don’t want to be stretching or overreaching, as you might hurt yourself or damage your light fixture.
- While working, wear rubber gloves and use tools with rubber grips. Doing both will reduce the (already very small) chance of shocks, while the rubber gloves will also help if anything you touch is hot.
- Make sure you unplug all valuable electronics before you turn off your breaker. Shutting off their power directly via the breaker can damage them.
- And last of all, if you’re in any doubt about your capabilities, don’t hesitate to hire an expert. Most people certainly don’t need one, but if you’re nervous or uncertain, hiring an expert is way better than getting electrocuted.
Final Thoughts
That’s everything you need to know about how to install a light fixture. See, we told you it was easy! With a few safety precautions and our simple step-by-step guide, it’s a quick, simple job, and most DIYers can get it done in minutes. Thanks for reading.
If you need any more lighting tips or advice, we have articles on how to safely remove a broken light bulb, 5 different types of light bulbs, and much more. We’re your one-stop shop for DIY hacks, tips and advice.