Stick of suffering through low-flow showers that don’t quite get you clean? Or perhaps you feel all the faucets in your home aren’t delivering the desired flow?
In either case, a lack of water pressure is the culprit. And the good news is it probably isn’t too difficult to resolve the issue.
But the best course of action depends on where the fault lies—is it one particular faucet, your pressure-reducing valve, or the city water supply?
In this post, we’ll teach you how to work out precisely where the problem is so you can ramp up your water pressure and start enjoying a satisfying flow.
Test the Water Pressure in Your Home
First things first, you want to work out whether the issue lies with one particular faucet or if there’s a water pressure shortage affecting the whole house.
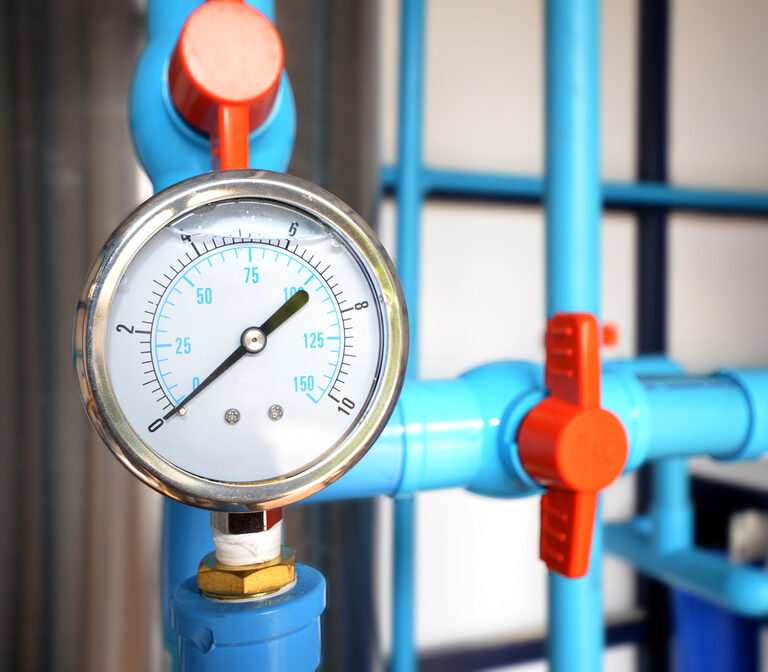
You won’t be able to gauge water pressure just by looking at it, so pop into your local hardware store or purchase a water-pressure gauge online. These nifty little units are super affordable and will instantly let you know how much pressure comes out of the tap.
Most gauges come with a standard garden hose thread. Take a look at your outdoor spigots to check what type of connector is in use, and purchase an adapter if necessary.
- Choose a random faucet that’s compatible with your gauge (outdoor taps work best).
- Screw the water-pressure gauge onto any faucet other than the one you’re having issues with.
- Turn the faucet on full blast.
- Monitor the reading on the pressure gauge.
The ideal pressure for a house on city water is from 45 to 55 pounds per square inch (PSI), although anything between 40 and 60 is generally okay.
If your water pressure is within that range, but you’re not happy with one particular faucet (i.e., the shower), you need to focus your attention there.
But if your water pressure is sub-40, you don’t have an issue with one specific faucet; you’ve got a water pressure shortage affecting the whole house.
Fixing Inadequate Water Pressure in a Shower
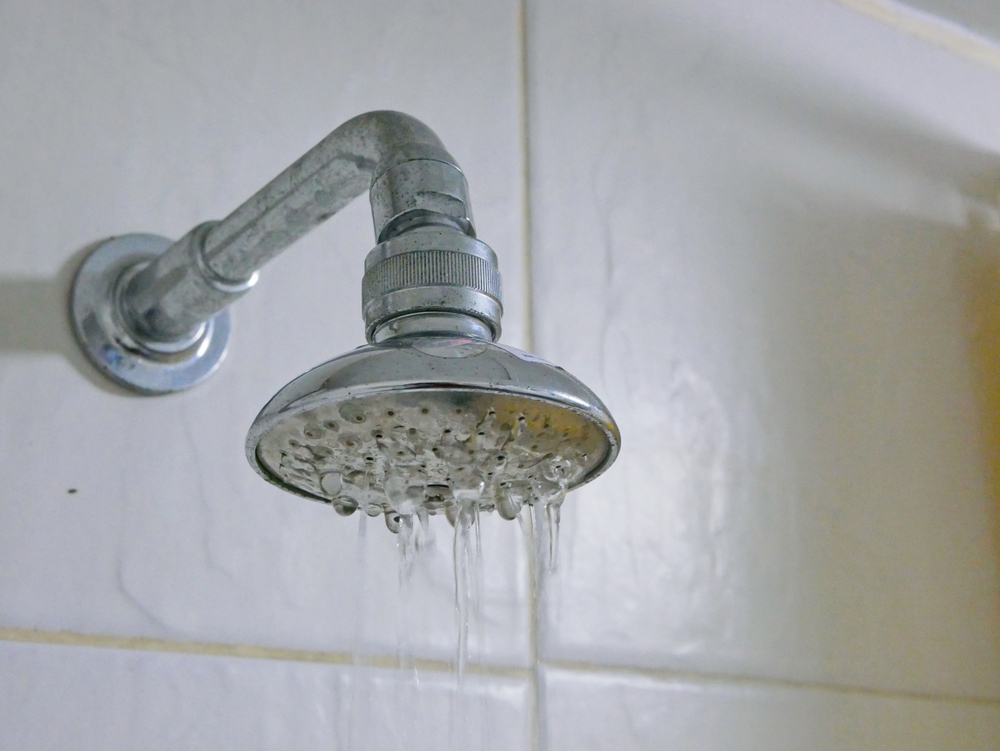
Lackluster water pressure in the shower is a common conundrum and worth looking into—nobody wants to suffer through an unsatisfactory daily bathing ritual, after all.
Test Your Shower Power
If the water pressure in your entire home is within the normal range, but you believe the shower isn’t producing enough flow, you can run an experiment to check the shower’s exact flow rate.
- Turn on the shower full blast and aim it into a bucket.
- Let the water flow for precisely 60 seconds.
- Measure the amount of water in the bucket by pouring it into multiple one-gallon containers
In 60 seconds, a properly functioning shower will have released around two gallons. If you have enough water to fill two containers, your shower is working fine.
But if you fill substantially less than two containers, your shower has an abnormally low flow rate.
Work Out What’s Wrong With the Shower
The most common problem is a clogged shower head.
- Remove the showerhead and check to see if it’s become clogged.
- Remove anything that could be clogging it and try running the water through again.
If that didn’t help, you need to work out whether it’s the showerhead or shower valve that’s the issue.
- Use the showerhead to spray water into a bucket for ten seconds.
- Take off the showerhead and spray water directly from the shower arm into a bucket for ten seconds.
If less water filled the bucket with the showerhead than the arm, the showerhead is inhibiting the flow.
Clean or Replace the Showerhead
An underperforming showerhead can be cleaned or replaced.
- Check the showerhead to ensure there aren’t any water flow settings you can tweak.
- Clean the showerhead thoroughly and unclog any debris.
- Google the brand and model to determine the flow rate in gallons per minute (GPM) and compare that figure with your experiment.
- If your showerhead isn’t producing the advertised GPM, replace it with a new one of the same GPM.
- Purchase a high-flow showerhead with a higher GPM if the current flow rate isn’t strong enough for you.
In America, the average shower flow rate is 2.1 GMP. Although it’s possible to go higher, it’s not necessary because 2 GMP is plenty. And remember: water is a precious natural resource.
Clean or Replace the Shower Valve
If the same amount of water flowed from the shower arm and the showerhead, the shower valve is the issue. It’s a lengthy and finicky task, but possible to DIY with some patience and basic skills.
- Block the shower drain.
- Turn off the water supply.
- Use a hex key to take off the handle.
- Unscrew and remove the trim plate.
- Remove the clip holding the shower valve with pliers.
- Unscrew the retainer nut (if there is one).
- Use pliers to pull out the old valve (you might need to jiggle it a bit).
- Use pliers to attach the new shower valve.
- Screw on the retainer nut (if there is one) and reattach the shower valve clip.
- Reattach the trim plate and handle.
- Turn on the water supply and test.
Confused? This short video will show you the ropes.
Alternatively, you could always call a plumber to get the job done.
Adjusting the Pressure-Reducing Valve
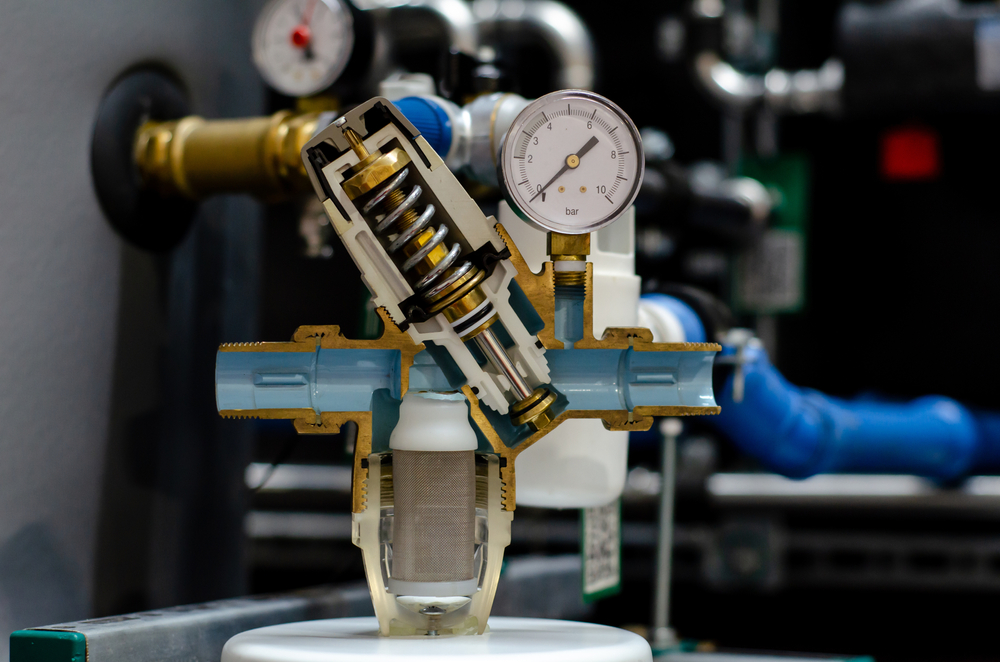
If you’ve got a water pressure shortage affecting the entire house, then the first place you want to check is the pressure-reducing valve. This little device plugs into your water mains to control the amount of pressure pumping through your pipes. On occasion, it may begin to malfunction due to wear and tear.
- Find out where your main water supply is.
- Look for a conical valve near the water meter that has a bolt protruding from the cone.
- Check the adjacent water pressure gauge.
Again, the water pressure gauge should be between 40 and 60 PSI. If it’s below that level, you’ll need to crank it up a notch.
Should it fall within that range, you could increase it a tad if you’re not happy with your current water flow. Don’t pump it up higher than 60 PSI, though, because excessive water pressure can damage pumps and result in leaks.
- Loosen the locknut.
- Turn the bolt anticlockwise to increase the pressure.
- Monitor the pressure gauge and adjust the bolt accordingly to achieve the desired PSI.
- Tighten the locknut once you’re done.
Pressure-reducing valves can malfunction after a decade or two. Consider replacing it with a new one if you can’t get the desired water pressure.
Investigating Other Options
If adjusting or replacing the pressure-reducing valve doesn’t achieve acceptable water pressure (40-60 PSI), then the issue lies outside your property.
Ask your neighbors whether they’re happy with their water pressure. Offer to test it for them if they’re not sure—you now know how to do this, so it’ll be easy.
If your neighbors don’t get adequate water pressure, your municipal water supplier is at fault. Call your water provider and ask them to verify the pressure in the area. The issue could lie in the water shut-off valve in your street; ask if they could check it out for you.
Installing a Water-Pressure Booster
If you’ve done all the above and your municipal water supplier can’t pump up the pressure, it’s time to take matters into your own hands.
Water-pressure boosters are expensive and require a complex installation. Consider this option as a last resort.
These machines work by using an electric pump to increase water pressure at the mains. This compact model from Grundfos works better than most—it’s super quiet and won’t get damaged if you run it dry.
- Locate a suitable place to install it (behind the mains shut-off valve works best).
- Turn off the water at the mains and draw it out of the pipes by running a faucet.
- Measure the pipe you plan to cut to install the pump.
- Mount your pipe on a solid base.
- Cut the pipe to your precise specifications.
- Remove any residual water by opening a high-level faucet in the home.
- Install the pump (don’t forget the check valve).
- Turn the mains back on.
- Run water through your pipes to prime the pump.
- Plug in and test the pump.
Again, it’s easier to understand through video.
Your pump should turn off automatically when it achieves the desired pressure. Don’t forget to check the entire area for leaks.
How to Increase Water Pressure: Final Thoughts
Substandard water pressure is a pain, but you don’t have to put up with it forever.
In this guide, we’ve shown you how to troubleshoot the issue and fix your water pressure woes accordingly.