If your chainsaw is running awkwardly, cutting bluntly or chopping in wonky lines, it’s going to need some maintenance in the form of a good ol’ sharpening. Blunt chainsaws are ineffective, irritating and dangerous, so it’s best to sharpen your chainsaw as soon as you can.
If you’ve never sharpened your chainsaw before, here’s some good news – it’s actually a surprisingly easy job. Here’s how to do it.
Can I Sharpen a Chainsaw All on My Own?
Yes, don’t be scared. Chainsaw sharpening seems intimidating until you try out, but it’s actually pretty easy. Go on, you can do it, I believe in you. Make your dreams come true.
All it takes is some good tools and ten minutes of your time. So while you can take your chainsaw to a professional or a hardware store if you want to, you absolutely don’t need to, no matter how inexperienced you think you are.
When you’re sharpening a chainsaw, all you’re really doing is sharpening the chain, so it’s a pretty easy job.
How to Sharpen a Chainsaw
To sharpen your chainsaw, follow these 5 steps:
1) Check if You Actually Need to Sharpen Your Chainsaw
If you think you do, you probably do. But it’s always good to check.
If your chainsaw is churning up dust, your cutters (or teeth, whatever you prefer to call them) are blunt, and therefore need to be sharpened. But if they’re still carving up fairly large chips, you’re probably okay.
If your cutters need sharpening because of overuse, carry on and sharpen. But if your cutters have dulled because of contact with dirt, mud, stones or some other interfering objects, you might need to replace your chain. But more on that later.
2) Gather Your Equipment
You won’t do much sharpening without the correct equipment. Here’s what you need:
- A round file. This needs to match the diameter of the teeth on your chainsaw. You can find this measurement in your manual or on the drive link. Common chain sizes are 5/32” 3/16” and 7/32”, but there are many others too.
- A flat file. This is for filing your depth gauges (whereas the round file is used for the chainsaw teeth).
- A file guide. This keeps your file at the correct angle, so that all of your filing is consistent.
- A depth gauge tool. This allows you to reset your depth gauges while you’re sharpening.
- A brush. This is for cleaning your chain before you start sharpening it.
The best and easiest thing to buy is a full, complete package of all the equipment you need, so that you don’t have to hunt for various things in your hardware store.
Something like this is cheap, convenient and offers all the basic tools described above (aside from a brush, but you’ve probably already got one of those).
The kit also includes all three common round file sizes, too. Why buy lots of things when you can just buy one thing? Another advantage of buying something like this is that it comes with instructions bespoke to the equipment, making it really easy to use. Perfect for beginners!
Still, if you want to do further due diligence when it comes to choosing the best chainsaw sharpener, you can check out our comprehensive buying guide.
3) Get Prepped
You need to do some prep and take some precautions, to make sure you’re doing things properly. These precautions will keep you safe and stop you from potentially ruining your chain:
- Get familiar with the various parts. Make sure you know where and what the cutters (or teeth) are, and where and what the depth gauges are. When you’re sharpening your chainsaw, these are (obviously) the two most important parts.
- Completely disconnect the power source, so there’s no chance that your chainsaw will suddenly rev up as you’re sharpening it. A chainsaw isn’t much use if you don’t have any arms left.
- Engage the chain brake.
- Fix your chainsaw in a vice, so you can do some hardcore sharpening without your chainsaw flopping around.
- Know how to use all of your tools properly, and familiarize yourself with what you’ll be doing.
- Wear some heavy duty gloves, to make sure you’re keeping your hands safe. Protective glasses are a good idea too, but they’re less important.
- Make sure the tension is set right on your chain, just as you should every time you cut with it. If the tension is set right, it’s much easier to properly sharpen the chain. If it isn’t set right, you might damage the chain or hurt yourself.
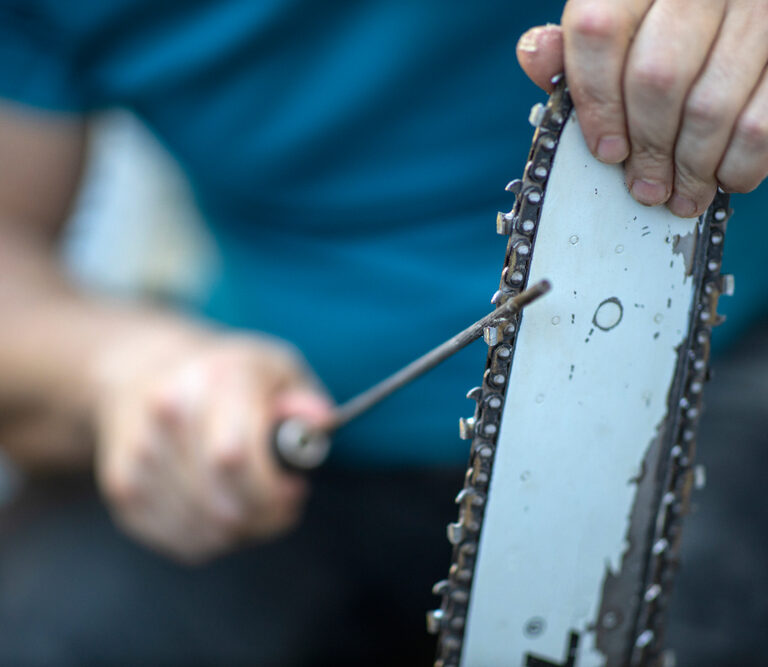
4) Start Sharpening
Here we go baby! The main event. This is what you’ve been waiting for, and we’re just about to begin. Here’s how to sharpen your chainsaw:
- Firstly, clean the chain using your brush. You can’t sharpen your chain properly if you haven’t cleaned it first.
- Make a small mark with a crayon or marker, to note where you started, or else you’ll end up accidentally sharpening the whole thing about ten times. When you need to move the chain on to access new teeth, you’ll (of course) need to temporarily release the brake.
- Set your file guide, to make sure you’re filing correctly and consistently at the right angle. For most chainsaws, this is usually 30 degrees, but each tooth will have a small line close to the bottom, which demonstrates the optimum angle for your particular chain.
- Use your round file to begin filing. Hold this file at a 90-degree angle to your file guide, and move the file at the angle you calculated in the previous step. Maintain these angles, or you’ll likely end up rounding off (and therefore blunting) the teeth.
- Each tooth should only need around 5 or 6 good strokes with the file to get it sharp again. When the cutter looks metallic and shiny, that’s when it’s been adequately sharpened. It’s a good idea to use the same amount of strokes for each tooth.
- Only sharpen every other tooth (the ones which are all pointing in the same direction). You’ll get to the other ones soon. And remember to file only away from yourself.
- It’s time to file your depth gauges. Depth gauges are the little rounded parts before each tooth, and they ensure the depth of your cuts are correct. Set your depth gauge tool, and if any of the depth gauges are on show above the tool, file them down with your flat file.
- When you’ve done that, flip your chainsaw around and do the whole process again, this time paying attention to the teeth which face the other way.
5) Use and Maintenance
That’s it. Easy, right? Congratulations, you’ve successfully sharpened your chainsaw, and it’s now ready for use. When you’re using your chainsaw, make sure you’re always staying safe. This is especially important when it’s just been sharpened (and when it’s very blunt).
It’s also important to routinely maintain your chainsaw. The more you look after it, the less you’ll need to resharpen it.
For a visual guide to the whole process we’ve just covered, give this video a try – it’s incredibly comprehensive.
Are There Any Easier Electrical Tools I Can Use?
Yeah, you can use some electrical tools, which make the job easier – a motorized grinder can make the job much quicker, for example. That said, they can be pricey, so they’re only really a worthwhile investment if you’re a heavy chainsaw user.
If you want to use something equally effective but less pricey, consider using a Dremel tool with a chainsaw-sharpening accessory stuck on the end.
What if I Need to Replace My Chainsaw Chain?
You can usually sharpen a chain around ten times before you’ll need to replace it. And, again, if you look after your chainsaw and your chain, you should get a decent amount of time out of it before you need to do any sharpening. But sometimes, a chain does eventually need to be replaced, no matter how much you look after it.
If you want to replace your chain, out of laziness, necessity, damage or whatever, here’s how to do it. When you’re replacing your chain, pay close attention and make sure you buy a chain that fits your chainsaw, since chainsaws and their chains come in many different sizes.
Sharp As Ever
So there you have it—our complete guide to sharpening a chainsaw. For occasional chainsaw users this process may appear complex (and dangerous) from afar, but once you get going we expect you’ll find it to be a relatively simple (and perhaps even relaxing) process.
Keep our guide nearby as you get to work and we’re sure you’ll be as sharp as ever.