
Whether you’re restoring the original look of your charming vintage tiles or eliminating unintended splatters, removing paint from ceramic tile is easy.
The best way to banish paint from tile depends on how long it’s been there and the type of finish. Decades-old paint requires heavy-duty commercial solvents to remove, and glazed tiles are prone to hazing when treated incorrectly.
To save time and money, and to prevent inadvertent damage to your tiles, we’ll show you how to remove paint safely using four tried-and-tested methods.
Safety First
Decades-old paint may contain lead, so you must pop on a dust mask before attempting any of these methods on older paint.
Additionally, paint remover fumes are hazardous to your health. Work in a well-ventilated area if you’re opting for Method 3, and use a safer citrus-based paint remover.
Method 1: Scraper
If you’ve recently given the room a fresh lick of paint and accidentally let wayward drips spill onto your tiles; don’t dismay. Getting rid of the unsightly splatter is simple.
When the paint hasn’t had sufficient time to cure (latex paints can take up to two weeks), you can remove it by simply scraping the splodges away. All you need is a utility knife.
While there’s no harm in trying this method on fully cured paint, it might not achieve the desired results. In that case, move on to Method 2 (or failing that, Method 3).
Step 1: Spot Test
Hold your utility knife at a 45-degree angle and start scraping at an inconspicuous part to test whether the blade will scratch the surface. If scraping results in scuffs, then skip to Method 3 or 4.
Step 2: Scrape
If the glaze seems okay, you can safely begin scraping away. Point the blade towards the edge of the paint and use short, firm strokes to pry it off the surface. Repeat the process until you’ve cleared all unwanted paint from the tiles.
Step 3: Clean
Use a damp rag to wipe off any loosened paint particles and give the tiles time to dry.
Method 2: Heat Gun
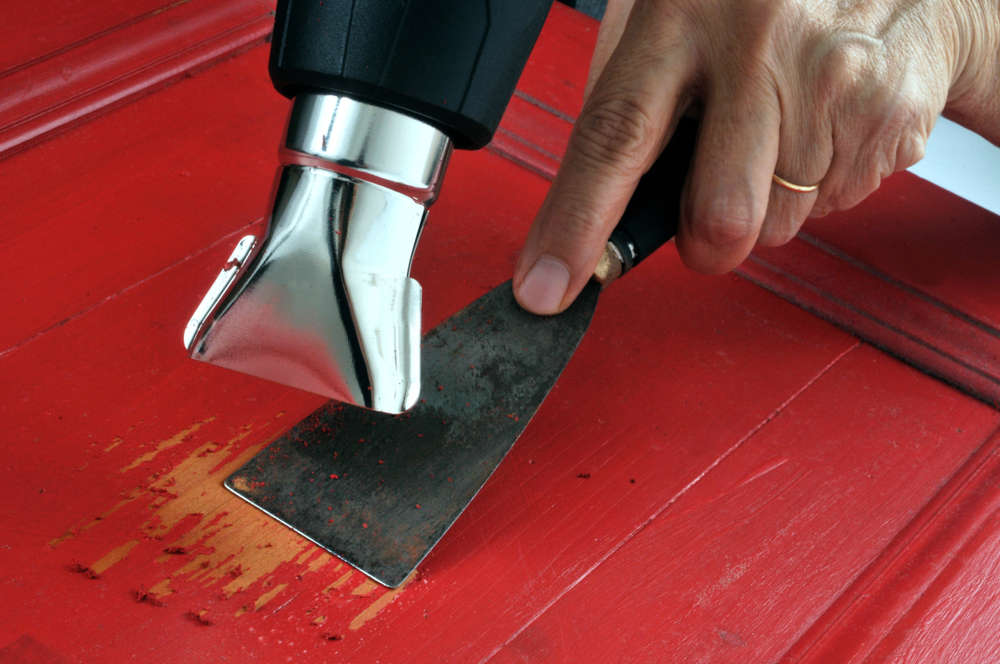
If a simple scraping didn’t do the trick, you could try enlisting a heat gun to loosen the stubborn, sticky paint. It’s a fairly drawn-out process, however, which is why we recommend attempting to scrape it off first.
Step 1: Heat
Work in small areas of approximately one square foot at a time to ensure the paint doesn’t cool down before you get the chance to scrape it off.
Fire up the heat gun and move it continuously around the paint until it starts to feel soft. Be careful not to hold the gun still at any time to avoid burning the tiles.
Step 2: Scrape
Grab your utility knife and hold it at a 45-degree angle, then start on the outside edge and use the blade to pry the paint away.
If all goes well, the paint will peel off in long strips. Work your way towards the center to remove all the remaining paint in the section.
Step 3: Repeat
Repeat the heating and scraping process in small one square foot sections until you’ve removed the paint from all your tiles.
Step 4: Clean
Wipe the tiles clean with a damp rag and give them time to dry.
Method 3: Commercial Paint Remover
If hot scraping didn’t yield acceptable results, it’s time to pull out the big guns.
Commercial paint removers do a brilliant job at unfastening paint from all sorts of surfaces, including your everyday household tiles.
But approach with caution. Some may damage the delicate glazing on tiles, in which case a vinegar solution (Method 4) is your best bet.
Citrus-based products like Sunnyside Corporation Paint Remover work well at removing paint without damaging the glazing on tiles.
Step 1: Prepare
Paint removers emit fumes containing harsh chemical compounds which you don’t want to inhale.
Although wearing a painter’s mask isn’t strictly necessary, it’s essential to work in a well-ventilated area, preferably outside. If you must work inside, open as many doors and windows as possible, then position a few fans around the room to increase airflow.
It’s best not to let paint remover get in contact with your skin, so pop on a pair of rubber gloves before you begin.
Step 2: Spot Test
Before you start applying large swathes of paint remover, you need to determine whether your product of choice will damage the glaze.
Dab a dry cloth into the product and rub it onto an inconspicuous part of your tiles (it doesn’t have to be a section with paint on it). Let the paint remover sit for the recommended time listed on the label.
If it doesn’t have any visible effect on your tiles, move on to Step 3. But if the glaze appears discolored or hazy, give the paint remover a miss and skip to Method 4 instead.
- Pro tip: It’s still possible to use paint remover when it damages the glaze. However, you’ll need to go to the extra effort of re-glazing your tiles.
Step 3: Apply
Now you know your paint remover of choice won’t harm your tiles, you can safely apply it to the painted portion.
Unlike the heat gun method, you can work on all your tiles at once—no need to confine your efforts to one square foot at a time.
Dab a dry rag into the product and apply it liberally over any paint you plan to remove. Let the paint remover sit for the recommended time to work its magic.
Step 4: Scrape
Hold a plastic scraper at a 45-degree angle and pry away the paint using short, firm strokes. Continue scraping until you’ve removed all the undesired paint from your tiles.
Step 5: Clean
Use a damp cloth to wipe off all the remaining paint remover and excess paint. Give the tiles time to dry.
Method 4: Hot Vinegar
If paint remover wreaked havoc on your tiles’ glaze (or you’d rather not use such a product), then you could opt for a more gentle, homemade solution instead.
Vinegar is highly acidic and works wonderfully at cleaning all kinds of things, including paint.
Step 1: Mix
Pour one cup of water and one cup of vinegar into a saucepan and bring the solution to a boil. Remove the solution from the heat and let it cool slightly until it’s safe enough to work with.
Step 2: Wipe
Soak a clean cloth in the solution and rub it vigorously over the painted portion of your tiles. The hot vinegar should soften the paint and cause it to loosen, with some flakes detaching completely.
Step 3: Scrub
Use a soft thistle brush to scrub off the loosened paint that remains on the tiles. Adopt gentle strokes to avoid inadvertently scratching the delicate glazing.
If necessary, apply more hot vinegar and continue scrubbing. When working with large areas, you may have to boil the solution again to ensure it remains sufficiently hot (heat is crucial with this method).
Step 4: Clean
Use a damp rag or a mop to clean up the vinegar solution and loosened flakes of paint.
Removing Paint From Grout
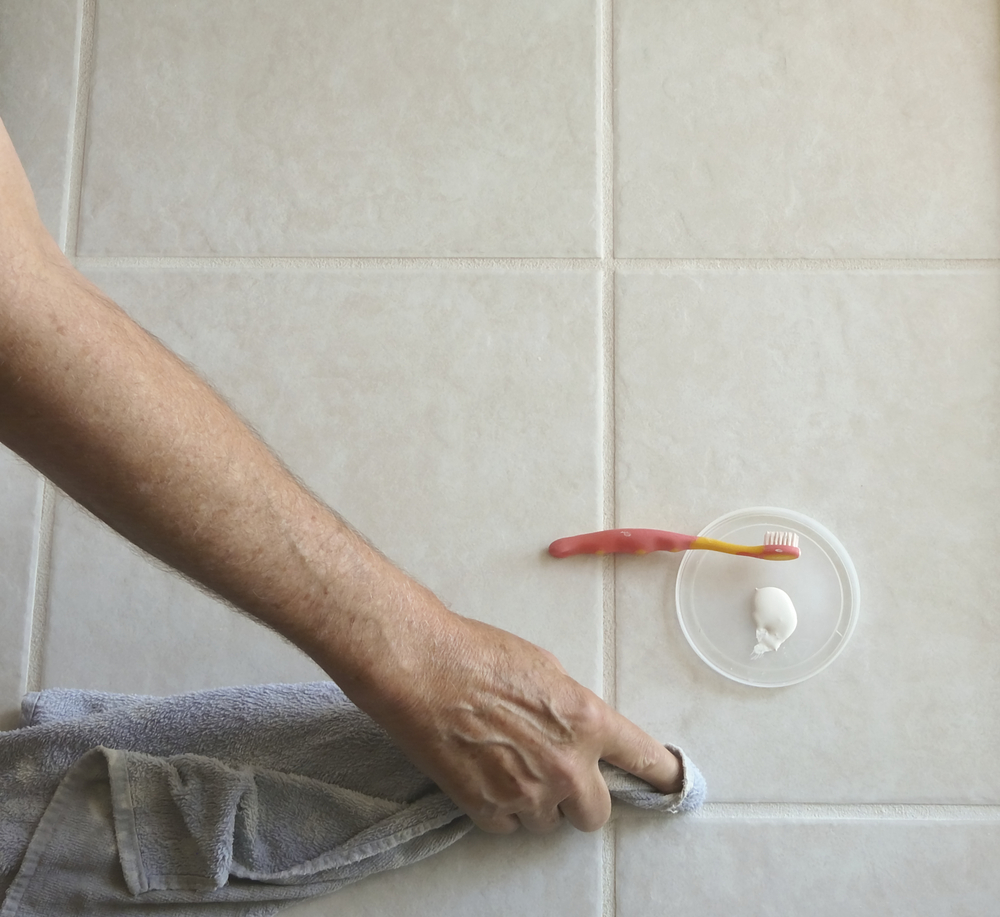
You’ve successfully eradicated all the paint from your tiles, but what about the grout wedged in-between?
If your grout has been sealed, the above methods should work on both the joints and the tiles. But if you (or the original contractor) never bothered to seal the grout, getting rid of unwanted paint can be a chore.
Try using a toothbrush dunked in paint remover to scrub away the paint—you’ll need to apply ample elbow grease and repeat the process several times. Failing that, you could paint over the old paint with a new color of your choice.
As a final resort, consider re-grouting the tiles (a long and laborious process).
Removing Paint From Tiles: Final Thoughts
As ceramic tiles are famously non-porous, it’s relatively easy to cleanse them of unwanted paint. The most efficient method depends on whether the paint is dry and the type of glazing used on your tiles.
By systematically working through our four suggested methods, you’ll eventually eliminate all the unwanted paint without damaging your lovely glazed tiles.