One of the best skills a homeowner can learn is how to regrout tile. Fresh grout can make your bathroom or shower tile look as new as the day you first installed it. Replacing crumbling or cracked grout the second you notice it can also save you money on more expensive retiling jobs down the road.
If you want to save money and revive the look of your tile at the same time, grab your grout removal saw and some gloves and get to work. In this article, you’ll find a step-by-step guide on how to regrout tile along with some other helpful tips for better grout and tile maintenance.
Should You Regrout or Retile?
In most cases, you should keep the tile and just replace the grout. Tile is incredibly durable, especially on vertical surfaces where it’s not exposed to as much wear and tear. So, if your shower or kitchen backsplash is starting to look a little sad, it probably just needs to be regrouted. It’s kind of amazing how much of a difference new grout can make.
The only time you need to retile is when there is visible damage to the tiles themselves. Even then, you wouldn’t need to redo the entire floor or shower unless the majority of tiles were damaged. Just replace the cracked ones.
You would also need to retile in the event of significant water damage from, say, a flood or long-term leak. Technically, your tiles will likely still be fine even then because they are waterproof. The problem is that the adhesive underneath will need to be redone.
If you do need retile after water damage, you can save some money by reusing the old tiles. Just make sure you don’t crack them in the removal process.
Try a Deep Clean First
Before you go through the labor of either regrouting or retiling, try doing a deep clean first. Grout will stain easily, especially if it wasn’t sealed. It can look like it’s been through decades of wear and tear when it’s actually only a year or two old.
If you don’t see any visible signs of crumbling or cracked grout lines, just give it a good scrub to see if you can revive it. Here are a couple tips:
- Let the grout lines soak in bleach for 15 minutes before scrubbing. Use oxygen bleach, not chlorine bleach. Chlorine bleach can stain grout lines.
- Use a scrub brush and abrasive cleaner like a baking soda and vinegar paste.
- When your lines are clean, maintain them by quickly wiping them down with vinegar or alcohol once a week.
If it crumbles under the pressure of scrubbing, you probably need to replace the grout after all.
What Tools Do You Need to Regrout Tile?
Grout removal does require a couple specialized tools. Fortunately, none of them are too expensive. For removing the old grout, you need the aptly named grout remover. This can either be manual or electric.
If you’re regrouting just a few tiles, you can use a manual remover which is essentially just a small blade with grit edge to saw through the grout. If you’re working on a large area, go for an electric option. Regrouting an entire bathroom with a manual grout saw is a level of tedium that nobody deserves to go through.
Here’s the full list of supplies you’ll need for the job:
- A manual grout remover or an electric grout remover. You could also use a small circular saw if you happen to already have one.
- A grout float
- A margin trowel
- Grout
- Dust mask, safety glasses, and utility gloves
- Sponge
- Soft rags
- Shop vacuum. If your household vacuum is strong enough to pick up grout pieces, that’ll do fine.
- 2 Buckets (one for mixing the grout and one with clean water for rinsing).
- Caulk (if sealing your lines).
How to Regrout Tile in 7 Steps
Regrouting your tile is a straightforward process. You just get rid of the old grout, lay down some new grout, and clean up the mess when everything is dried.
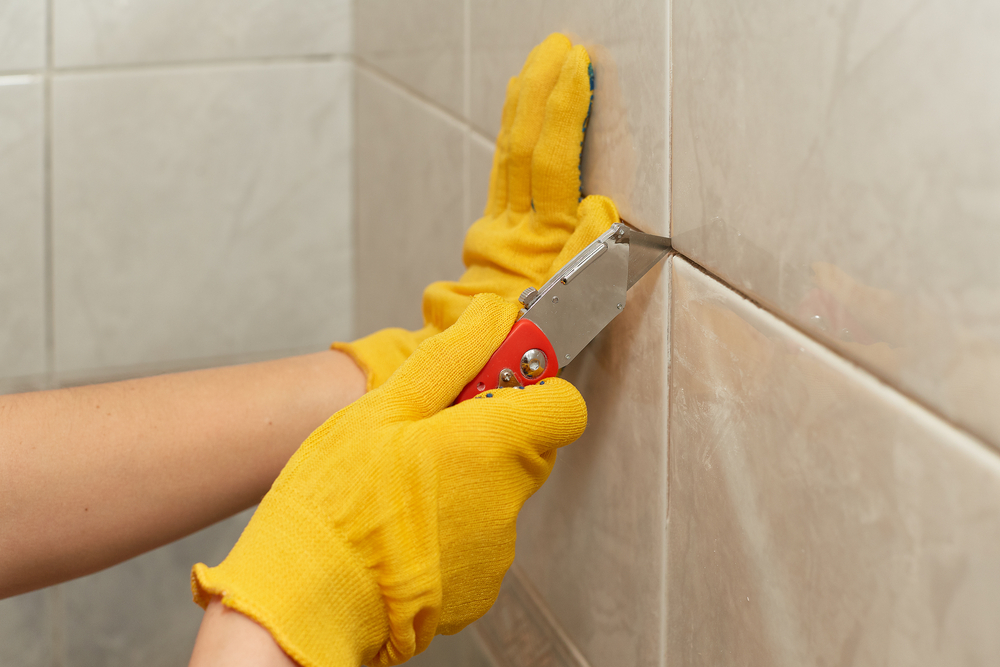
1. Remove the Old Grout
Saw down at least 1/8 of an inch into the old grout by moving the saw straight across the grout line. Work at a steady enough pace that you’re not stopping at any point but you’re not going so fast that you lose control of the direction of the saw. Focus on keeping your saw in a straight line so it doesn’t veer off and nick the tile.
Most grout will crumble away quickly under the pressure of an electric grout removal tool. If you come to a stubborn section, just move passed it; you can come back to it with a manual grout saw later. If you stay too long at one section, you risk sawing too close to the tile edge and damaging a tile.
Go over each line a couple times with your electric tool. Then, get whatever remaining bits there are with a manual saw.
2. Get Rid of the Debris
When the sawing is done, you’ll have a mix of dust and larger chunks of old grout left behind. Some of this will be on the tile and some will be stuck between the grout lines. In both cases, you want to use a powerful vacuum (like a shop vacuum) to get rid of this.
If you wipe it off or sweep it, the debris could end up scratching your tile. You could also end up leaving a lot behind inside your grout lines. That excess dust and debris will make it difficult for the new grout to form a secure bond to the tile.
So, use a vacuum cleaner and to remove all the dust and debris. Pay special attention to the lines themselves to make sure they are completely clean.
3. Wipe Down the Tile
Use a damp rag to wipe down your tile, removing any film of excess dust that was left behind during grout removal. Don’t use a sopping wet rag because you don’t want to overly dampen the spaces between the tiles. Don’t apply too much pressure, either, as the grout dust could scratch your tiles.
4. Mix Your New Grout
Fill one of your buckets with grout mix and water. The bag you buy will come with its own instructions for what proportion of water to mix you should use. Make enough to cover the full surface area of the space you are regrouting.
Use the margin trowel to mix the grout thoroughly and make sure to scrape along the sides and bottom as you mix so that there are no patches of dry powder. The finished mixture should look something like pancake mix: easy to spread but not runny. You might need to add a splash of water here or a handful of grout powder there to get the right consistency.
Doublecheck the manufacturer’s instructions. Some mixes need to sit (slake) for a bit before you can start working with it. If your grout needs to slake and you skip that step, it won’t apply smoothly.
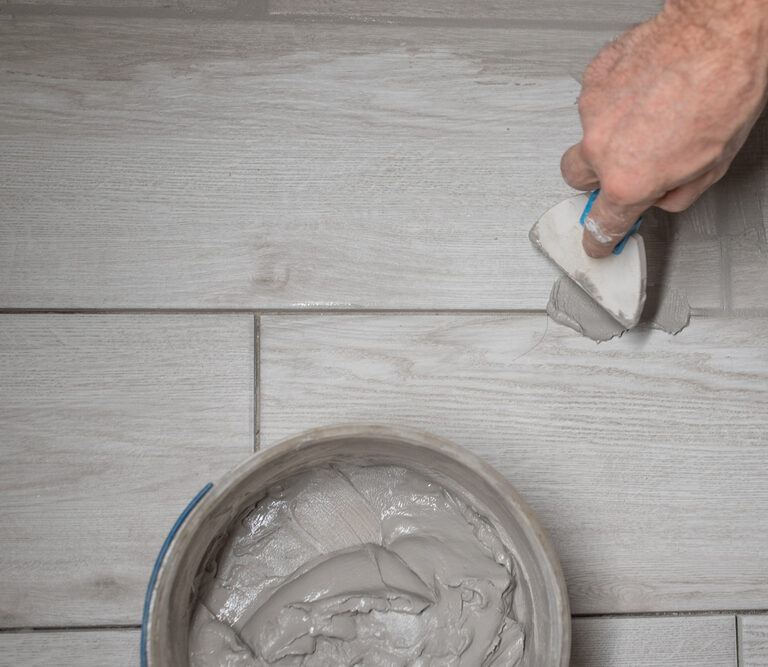
5. Fill the Grout Joints
Scoop some of the grout onto your float and spread it diagonally across the grout line in a smooth, medium-pressure motion. Smear the grout in alternating directions to make sure the line is completely filled before moving on. Watch this tutorial on how to grout your tile to see what kind of motion you should be using to fill the lines. You want a full, even line without any dents or air pockets.
Scrape off excess grout and move on to the next line only when you’re confident the line is filled evenly. Once the grout dries, it’s not possible to “patch” any gaps from an uneven fill. You would need to remove the grout and do it again.
6. Clean the Excess Grout
Let the lines dry for 30 minutes to an hour. Then, fill a bucket with clean, warm water. Use a soft, large sponge to wipe away the excess grout on your tiles. Don’t apply too much pressure. Your lines are still wet so pressing down too hard could push out the grout.
Even after sponging the whole floor, you’ll still notice a faint haze of grout leftover on your tile. This is fine. You’ll remove this later. For now, just sponge away what you can without disturbing the grout lines.
7. Remove the Grout Haze
After most of the mess is gone, let your grout lines dry completely. Wait for as long as your grout mix recommends. If you’re in a humid climate or poorly ventilated room, add a little extra time to that wait to be sure the lines are dry.
Once they’re dry, go in with another bucket of clean, warm water and two rags. Dampen one rag and make sure that you ring it out well. You don’t want to use excess water on this step because that could make the fine dust film turn into muddy grout which will cling to surfaces.
Use the damp rag to gently wipe away the haze. After wiping a section with the damp rag, go over the same section with the dry rag. You might need to repeat this step a couple times to get rid of all the haze. Between each repeat, let the floor dry completely so that you’re working with dust instead of mud.
8. Seal Your Lines
This last step is optional but highly recommended. Grout is generally not waterproof or stain-resistant which makes it prone to damage and aging if left unprotected. Sealing those lines with caulk will prevent both of those things so your grout will last longer, and your lines will be much easier to keep clean.
To seal them, you just apply a thin layer of caulk over the grout and smooth it down gently with your finger.
If you don’t like the look of caulked lines, you could opt for epoxy grout which is both waterproof and stain resistant. It doesn’t require caulk sealing so you keep that exposed grout look but it is a lot more expensive.
Deep Grout Looking Brand New
Once your fresh grout is dried, maintain it with regular care and cleaning so that you can avoid the hard work of regrouting tile as long as possible. Keep tiled rooms well ventilated at all times and do a quick wipe down with a vinegar-soaked rag at least once week. With those simple habits, your new grout will continue to look brand new for years to come!