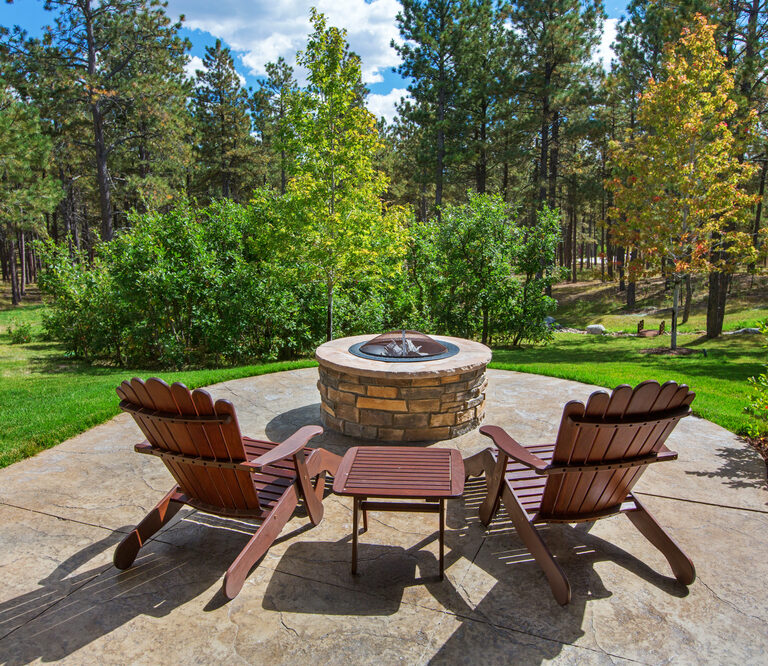
Nothing unlocks the cozy comfort of your yard like a nice, warm fire pit. You can sit by it on a chilly autumn evening, hear the wood crackling, while sharing some time with friends and family.
Aside from being an aesthetically pleasing addition to your yard, they’re also a fun project to undertake. Alternatively, commissioning one costs around $700 on average, and that’s an unnecessary expense if you would enjoy the task of doing it yourself. This article will show you how.
Planning a Fire Pit
Sitting around a fire is as old as human behavior gets. Human-made fire pits date back to almost 400,000 years ago and were the technological and social turning point for many civilizations. You could say that by building one in your backyard, you’re basically graduating as a human being.
However, from planning to construction, you need to read about a series of relevant considerations before starting this journey of self-discovery and cement bricks.
Choose the Type of Fire Pit You Want
There are three main types of fire pits. Each has its own set of benefits and drawbacks, but this guide concentrates on non-portable, wood-burning ones. However, you should be aware of the different options available out there, including square and round varieties.
- Wood Burning Fire Pit
These are the most common type of fire pit. They’re usually built out of bricks and cement and can double as grills if you have a wide enough gate for the mouth of the pit. They don’t have to be a permanent installation, and you can set them up and take them down with (relative) ease.
- Gas Firepits
These fire pits are convenient and easy to operate. You should leave the construction of this type of fireplace for professionals. It requires knowledge and manipulation of gas pipes.
- Portable
As their name indicates, you can move these fire pits around. They require little to no construction as they come pre-installed. Their drawback is their benefit, as some people prefer to have a permanent fireplace that brings more aesthetically-pleasing results.
Before buying the materials, you need to make sure that your fire pit will comply with regulations. This step is not always a straightforward process because different counties and cities will have their own ordinances. Additionally, you should call 811 to see if there are any utility lines buried in your yard. It’s unlikely you will hit any since you won’t be digging too deep, but it’s better to know if you’re building a permanent fire pit.
The best way to do this is to contact your local municipality or fire department and consult with them. Even after building it, you should be familiar with the EPA recommendations on fire pit use. Ensuring you’re within the legal right to construct and use it is the first step to building it and saving yourself from future headaches.
Choose a Location
Choosing the best location is both a matter of compliance with regulations and personal preference. Try using some chalk or lay out a hose to draw the firepit’s shape in the place that you think would look the best. Keep these things in mind:
- You need an open and level space that is entirely free of overhead tree limbs and branches. Make sure that there are no buildings or structures within 10 feet of the fire pit.
- Consider the direction the wind usually blows so it doesn’t compromise your property when you use the fire pit.
- Make sure you have space for a seating area, so people can sit as close or as far away as they like. Generally speaking, 7 feet is more than enough.
Materials and Tools Required
Now it’s time to account for the supplies you’ll need to complete your project. Make sure the concrete bricks are shaped for the kind of pit you want to build. If they aren’t, you may have to spend additional time cutting the bricks or spending more money than you anticipated.
If you’re having a hard time sourcing the materials, you should know that most well-known hardware stores usually sell different types of fire pit kits that include properly shaped bricks and a metal ring.
Some materials are optional because they would make the process and final result better but are not a must-have. For a basic wood-burning fire pit, you’ll need:
Tools and Materials Needed:
- Shovel
- Tape measure
- Level
- Mason’s line
- Masonry trowel
- Rubber mallet
- Tamper
- Masonry saw
- Metal fire pit insert (optional)
- Concrete blocks or pavers
- Gravel
- Sand
- Fireproof mortar
- Firebrick
How to Construct the Fire Pit
Now you have all the materials and know where you want the fire pit to be, this is how you do it.

Step 1: Mark the Location
Once you have chosen the spot for your fire pit, mark the area using spray paint or a string and stakes. Use a tape measure and level to ensure that the spot is level.
Step 2: Excavate the Area
Use a shovel to excavate the area to a depth of about 8 inches. Use a tamper to compact the soil to create a firm base for the fire pit.
Step 3: Add Gravel
Add a layer of gravel to the excavated area to provide drainage and stability. Use a level to ensure that the gravel is level and compact it using a tamper.
Step 4: Add Sand
Add a layer of sand on top of the gravel to create a smooth and level surface for the fire pit. Use a level to ensure that the sand is level and smooth it out with a rake.
Place the Stones
Step 1: Lay the First Course
Lay the first course of concrete blocks or pavers around the perimeter of the excavated area. Use a rubber mallet to tap the blocks into place and a level to ensure that they are level.
Step 2: Add Fireproof Mortar
Add a layer of fireproof mortar between each block or paver to create a stable base for the fire pit.
Step 3: Lay the Second Course
Lay the second course of blocks or pavers on top of the first course, making sure to stagger the joints for added stability. Use a level to ensure that the blocks are level and tap them into place using a rubber mallet. You may need a third course depending on the size of your firepit, so repeat these steps as necessary.
Step 4: Add Firebrick
Add a layer of firebrick to the inside of the fire pit, using fireproof mortar to hold them in place. Make sure the firebrick is level and use a masonry saw to cut any bricks that need to be trimmed.
Step 5: Install the Fire Pit Insert (Optional)
If you’re using a fire pit insert, install it now according to the manufacturer’s instructions.
Step 6: Finish the Fire Pit
Add a final layer of blocks or pavers to the top of the fire pit. Use fireproof mortar to hold them in place and make sure they are level. Let the mortar dry for at least 24 hours before using the fire pit.
After adding the final layer and putting the ring on top, you can add any decorative stone inside the pit, such as lava rocks. Make sure the stones you add don’t retain water and are heat resistant.
Start a Fire
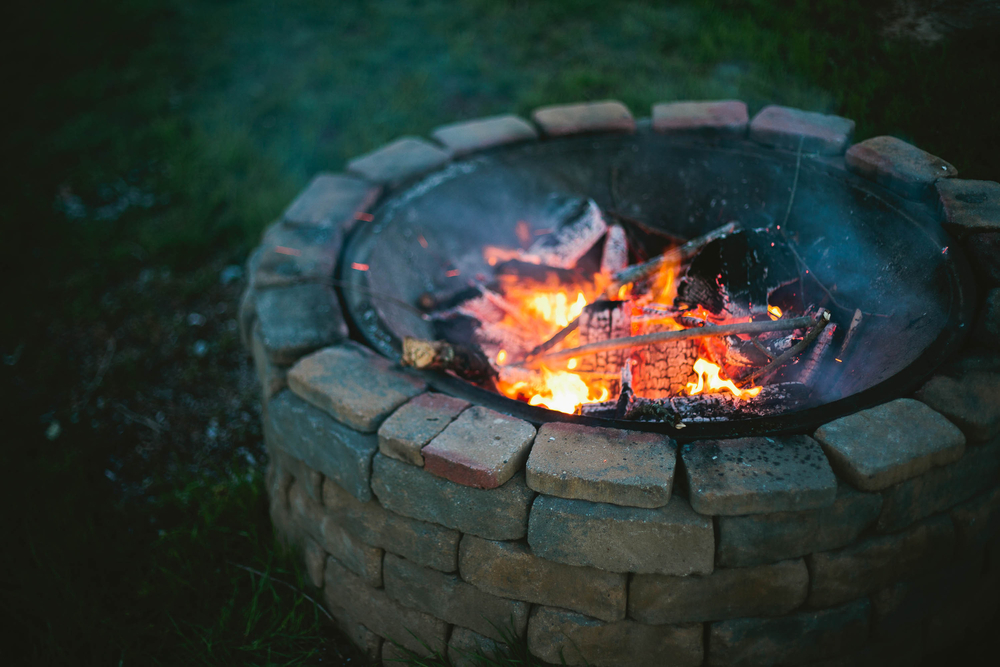
It’s time to enjoy that hard work! Avoid wearing any flammable clothing while starting the fire, and be careful about your surroundings. Make sure the area around the fire pit is clear. Start by adding dry leaves, newspaper pages, or small branches at the pit’s bottom for a fire bed. But don’t just throw them in there. Try to build a tiny pyramid that is 3 to 4 inches high.
Now is time to add some larger logs to allow the fire to burn for longer. Try to stack them as pyramids too, with the fire bed beneath them. Leave a little bit of space so you can light up the base with ease. If it’s your first time, this may take a few tries, but once you’re done it a few times it becomes easy.
Final Thoughts
Fire pits have been an important symbol of human societies through history, and in the 21st century, they also make our backyards look extra nice. Whether you want to tell scary stories in the dark, toast marshmallows, or just relax for a while, you won’t regret having one. Just get ready for your house to be the new designated place for all friends and family gatherings, as they will surely want to spend some time by the cozy fire.