The burnt wood finish is becoming steadily more popular among wooden-built furniture and homes, and for a good reason. This finish is stunningly beautiful when completed correctly and has more than one benefit that makes it more attractive than other wood finishes. Plus, this style can be DIY-ed easily if you know your way around a propane torch.
If you’re interested in sprucing your next projects up with a burnt wood finish, you’re in luck! In this article, we’ll tell you everything you need to know about the burnt wood finish, including its history, and give you DIY tips to recreate this unique style at home.
What Is a Burnt Wood Finish?
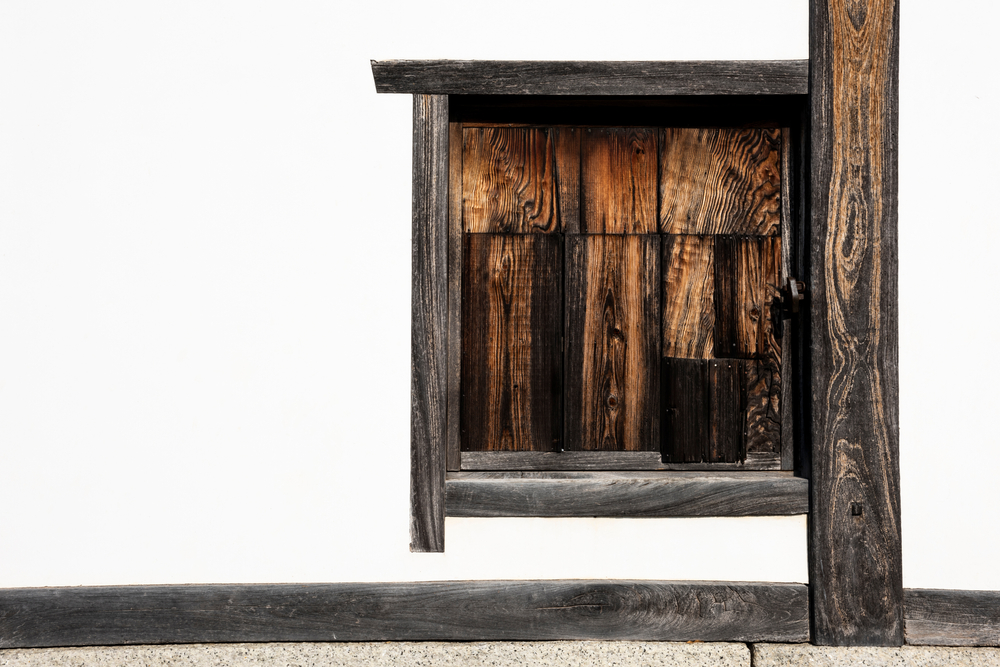
Dating back to approximately the 18th century in Japan, burnt wood finish is also referred to by its Japanese name – Shou Sugi Ban. This name literally translates to “burnt cedar board” and gives an insight onto the basic technique of the finish, which is preserving wood with fire.
To create shou sugi ban, controlled fire or torches are used to scorch the wooden boards, traditionally cedar boards, and allowing the wood to cool completely. From there, the char will be scrubbed at and softened with a wire brush and the excess charcoal and dust removed. To finish, the wood will be sealed with a natural oil or stain.
This entire process leaves the wood with a completely matte black finish that has streaks of shining silver, thanks to the charcoal created. If desired, the wood can be scrubbed more to reveal more of the natural color underneath, creating a lighter finished board that bears the unique tracings of burn marks. This process also fortifies and adds certain benefits to the wood, which we will discuss more later.
It should be noted that soft, porous woods such as cedar, pine, and fire are the prime candidates for this finish. This is because they are less dense than harder woods like teak or walnut, allowing them to char more quickly and produce the desired finish with ease.
Traditionally, the shou sugi ban finish was used in traditional Japanese homes, applied to the exterior wood of buildings in order to fortify them and protect against the weather. Today, the finish is used both inside and out of homes, with the finish being used as a design element in many western homes. Nowadays, you can find the shou sugi ban finish on everything from walls, siding, and patios, to dressers, tables, and chairs, and even used as decorative pieces in some homes.
Why Is Burnt Wood Finish Popular?
The popularity behind the burnt wood finish can be traced back to the unique style it offers and the many benefits it leaves behind.
It Reduces Risk of Fire
One of the most prominent reasons this finish was popular in 18th century Japan is the fact that it leaves the wood very resistant to flame. This is due to the charring process removing the soft cellulose layer of wood and leaving behind a much harder lignin layer. This layer requires a much higher temperature and more flame exposure to start burning, leaving the wood overall more resistant to catching fire.
It Deters Bacteria and Pests
Acting as a natural deterrent for both bacteria and pests, the charring process of a burnt wood finish gets rid of any of the soft cellulose layer in the wood; without cellulose, bacteria and other pests have nothing to feed on, which prevents the growth of fungal and pest-related wood damage. This also makes burnt wood finish a great option for using outdoors on patios, as you will never need to treat the wood with commercial preservatives thanks to the finish.
It Is Moisture Resistant
Another highly useful element of the burnt wood finish is the fact that it is moisture resistant. The layer of char left on the surface of the wood during the burning process seals and protects the natural wood underneath, preventing water and water vapor from entering into the wood. In turn, this prevents warping, rotting, wood swelling, and erosion.
This moisture resistance also makes the finish a great choice for using on exterior siding and outdoor areas that may come into contact with lots of water.
A Variety of Colors Are Possible
Highly customizable, the dark color on a shou sugi ban finished board can be lightened up to create a more natural look. Depending on the amount of char you soften and scrub off, you can make the board lighter in appearance or leave it darker. This allows you to perfectly customize the finish to match your home or design ideas. You can also use the darker finish of the board as an easy alternative to regular wood that is stained with a darker paint.
It Adds a Unique Texture
Depending on the wood used and how long the piece was burnt for, you can achieve a range of unique textures on your wood. Japanese cedar will always produce the best appearance in terms of burn marks and color, but you can always experiment with other soft woods.
This unique texture allows you a lot of freedom when designing with the finished wood, and you can use shou sugi ban as a way to spice up the decoration in your home or bring more life to the exterior of your home.
How to DIY Burnt Wood Finish at Home
If you are comfortable using a torch as a controlled flame, you should have no problem DIY-ing your own shou sugi ban finish from the comfort of your home.
Gather Your Materials
To create the best burnt wood finish, you should be gathering softwoods, such as cedar, pine, or fire. If you are not sure which wood you best prefer, gather a small piece of each and try out the shou sugi ban process on them, evaluating the appearance and then making your final decision.
You will also need a propane torch; even though both controlled fires and torches will work to create this finish, propane torches are recommended due to their ease of use and ability to be controlled, both in terms of flame intensity and in targeting the area you are burning.
Make sure that any torch you purchase reaches at least 1,000 degrees Fahrenheit in the open air, because your wood will only start to char between 500 and 1,000 degrees Fahrenheit, with 1,000 degrees being the preferred temperature to use on the wood.
To complete the finish, you will need a wire brush for scrubbing at the charcoal and a couple of cloths to remove any excess dust and soot.
Prepare Your Working Area
Before you get to work charring your wood pieces, you should make sure you are in an open area; it is not safe to use a propane torch in an enclosed space due to risk of fumes and starting fires.
You should be propping your wood piece on a completely flat, level surface in order to achieve the most even burn, and you should be wearing all the recommended safety gear, such as fireproof gloves and safety goggles.
Make sure that you don’t sand down the wood before torching it; the burning process will remove any rough patches, and sanding it before could result in a less than natural-looking finish. However, if there are any splinters or deep grooves present in the wood, you can remove these with 150-grit or higher sandpaper.
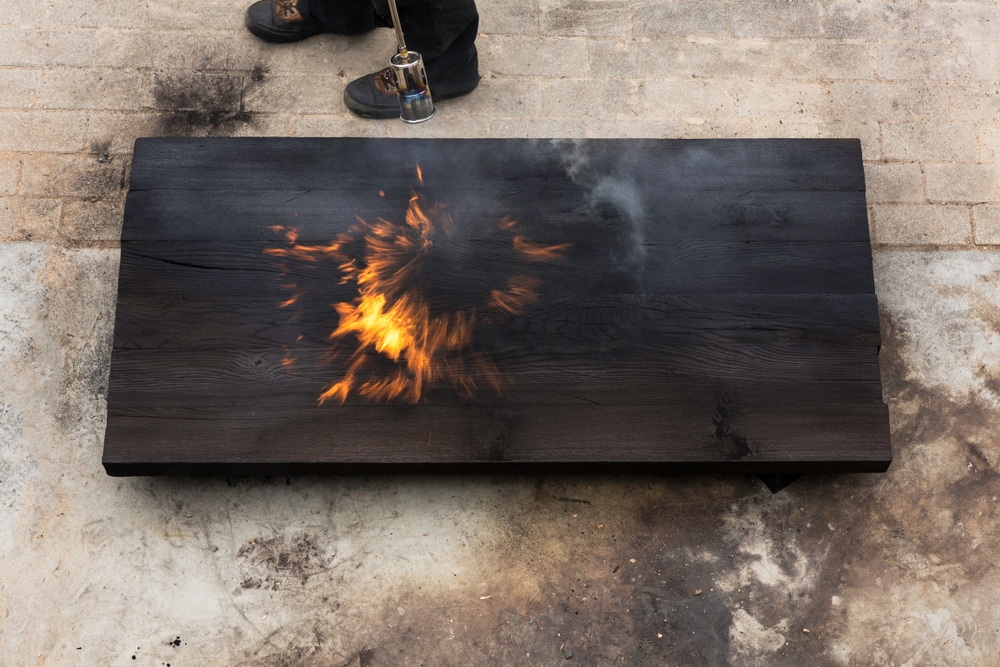
Maintain Control of the Burn
Slow and steady is the key to creating a char on the wood that doesn’t go out of control. The smaller the flame you use, the more intense the heat will be. For best results, you should be using a flame that is only one or two inches long to ensure that the hottest part of the flame stays in contact with the wood at all times.
Move the flame slowly across the piece of wood, working in small sections. You should be holding the flame over the area until it begins to turn black, which takes approximately 10 seconds. Once one section is blackened, move to the next, making sure to take your time to really char each section of wood.
If you notice small cracks starting to appear in the wood surface, turn the intensity of your flame down, as a lower flame intensity will prevent more cracks from appearing.
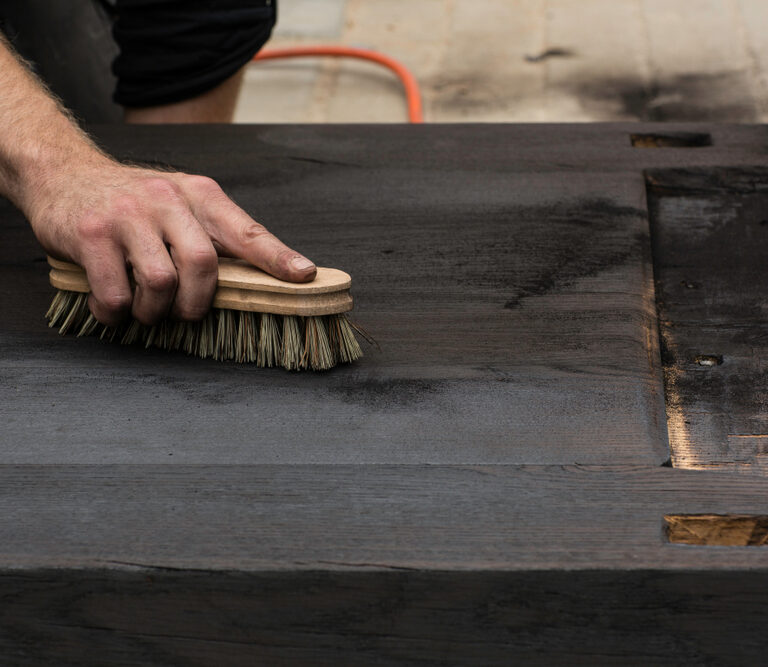
Scrub to the Desired Color
After the wood has cooled down completely (this takes approximately 5 to 10 minutes), begin to scrub the wood section by section using a wire brush. You should start lightly, removing a light layer of char to reveal the wood grain underneath. The more you brush at the char, the lighter the completed finish will be.
Remove Excess Dirt
Once you’ve scrubbed the wood board to your desired color, you should take a damp cloth and wipe it along the board. This will remove any excess dirt or soot and allow you to truly see the finish of the piece. From there, you can scrub the char again to achieve your desired color, or you can move onto the next step.
Finish With Oil or Stain
If you want to maintain a more rough and natural look with your wood, you can leave the piece bare without applying any type of stain or wood finish to it. On the other hand, you can apply a drying oil to the wood in order to give it a light coating and further enhance its weather resistance – this is a great option if you are using your shou sugi ban wood outside. Just remember to reapply the drying oil every 10 to 15 years to maintain it.
If you prefer your burnt wood finish to have a color to it, you could alternatively invest in a wood stain or paint. These stains will add a splash of color to the already unique shou sugi ban finish and may also work to seal the wood, further protecting it from the elements.
A Flexible and Fortified Design
The burnt wood finish, also known as shou sugi ban, is a highly popular design thanks to its unique look and many benefits. If you are thinking about putting wood finished with this style in your home, you can easily follow our simple DIY steps to obtain this finish, or you can hire a professional to bring your plans for burnt wood to life. Either way, the burnt wood finish is a fantastic way to spice up the decoration either inside or outside of your home.